
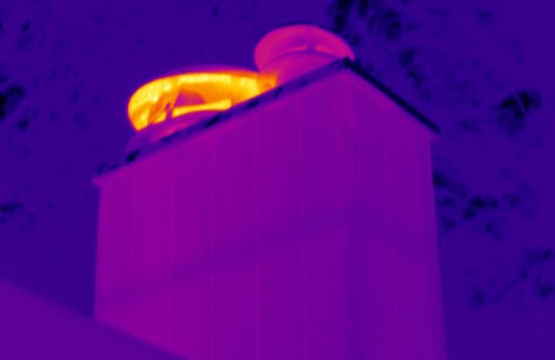
One aspect of camera improvement in recent years that seems to have lagged is the quality of the onboard digital camera. My first IR imager didn’t even have one, so anything is an improvement over that. Or at least you would think. One of the things that you’ll discover that us “old school” thermographers have mastered is capturing images with a digital camera with very close symmetry and field of view compared to the thermal image captured with whatever camera we’re using. That comes from years of having to do that because we had nothing else.
Honestly, we still don’t have much. The average resolution of the onboard digital camera in most modern IR imagers is 2 megapixels. No, that’s not a typo. Two. Dos, en Español. The resolution on the camera on my phone is 12 megapixels. You can buy digital cameras at 16, 20 and higher for under $100. I’m not trying to beat up the camera manufacturers, I’m sure there are considerations regarding this phenomenon that are outside of my level of involvement in that part of our industry. This issue though leaves us who practice this technology in need of a solution. Luckily, solutions are what we do here.
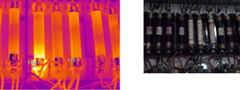
See the image to the left? This is a screenshot of what I get in the reporting software for one of the major imagers on the market when I select the digital image this camera takes along with the thermal image. Now this image isn’t poor quality, in fact, it’s good enough that I can tell there are two different brands of fuses in use here. But, the perspective is off. When I press the Save button, the thermal imager takes both pictures. The effect we see is all about optics. The Field of View (FOV) between the IR imager and the digital camera is different. In the imager software though I can choose to use a different digital picture. These are often referred to as “reference image”. If I choose to take one another way, I can drop it in, and it’s not hard to do.
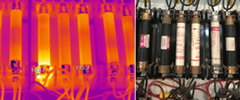
Over on the right is a screenshot of what I get when I drop in my own digital image. This image was taken with my phone, and I was able to closely replicate the perspective by moving my phone slightly closer to the components than my thermal imager was when I captured that image. It’s important to remember that safety needs to be considered when capturing images of any type. You should NEVER encroach upon the shock protection boundaries for the equipment you’re inspecting. If you’re inside the arc flash boundary, make sure you’re adorned in the right PPE for the risk associated with the equipment. Using a separate digital camera has obvious drawbacks, but most of them can be overcome with mastering your process for doing it. With practice, you can master this technique to the point that your perspective is nearly flawless compared to the perspective of the thermal image. To me personally, the difference in image quality makes it worth the extra time.
As with any of the tips you see from us, we welcome your feedback on how helpful they’ve been. Email us at [email protected] with your comments. Think Thermally!®