


In last month’s posting, we briefly discussed about the importance of motors and motor testing. We also deliberated about the first step to take—personal preparation—and how they should understand the tester equipment, motor operation, and developing proficiency in testing. We then turned our attention to the second step—preparation for equipment to be tested—and criticality of equipment from multiple perspectives; operational, safety, logistical and environmental.
This month, we discuss the next three steps to take to gathering effective electrical motor data.
Step 3 – Preparation of Test Equipment
In order to perform motor testing effectively, the test equipment should be in optimal condition. The tester should be in calibration with the most recent updates to the operating software (Note: when updating software be aware of possible compatibility issues. New software updates should clearly explain any operating systems (OS) that are and are not supported.) Software upgrades are essential. Many times they correct inaccuracies or provide important safety procedures or steps. The associated equipage should be inspected and tested, as applicable, to prevent problems when in the field conducting tests. Conduct a check of the equipment the day before testing is scheduled. A simple generic checklist will help with the readiness of the equipment:
Checklist for Effective Testing:
- All batteries operable and charged
- Deep cycle batteries as required
- Test leads are free of any nicks or cuts in the insulation
- Voltage clips or test clips are clean and free of any foreign debris or corrosion
- Voltage clips or test clips are snuggly threaded or make a tight fit on test leads
- Current probes have good batteries (if applicable)
- Inspect power cords for nicks and breaks in the insulation
- Current probes jaws are clean and free of any foreign debris at both the top and hinge point
- Current probe spring tension is good
- Test lead connection points on the test instrument are clean and free of dust and foreign debris
- All electrical and data port cables on your test instrument are properly connected.
Step 4 – Check Operational Status of the Tester
Prior to acquisition of any test data, a quick operational test of the motor test instrument should be conducted. Use of a small test motor or stator will verify that the de-energized test data acquired, is accurate or repeat- able.
To verify accurate energized data, perform a quick power quality test. Place all current probes on one phase cable and run the test. Compare bus phase voltages to acquired voltages and all of the amperage readings should be the same. Once you feel comfortable that you are collecting reliable data, begin your testing route.
Step 5 – Maximize the Amount of Circuit Under Test (and the Amount of Load on the Circuit)
If you are devoting the time to conduct testing, you should test as much of the circuit as possible.
De-energized testing is usually conducted downstream of the de-energized contactor. With de-energized testing, connections made upstream will identify circuit anomalies between the connection point and the motor. Once identified, circuit isolation can be conducted and the source localized.
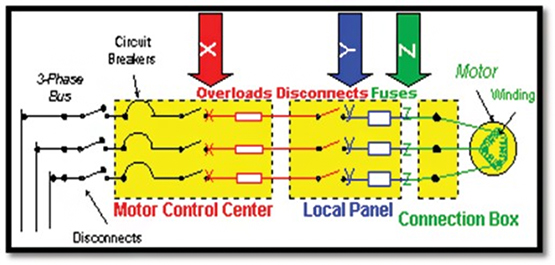
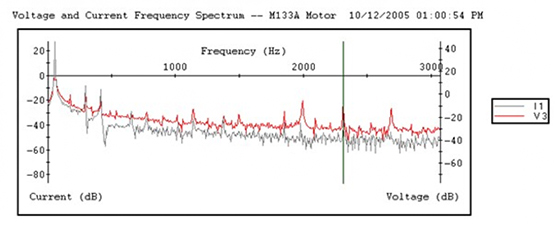
Energized testing should be performed from the starter cabinet, connections should provide at least one local level of circuit protection above the point of connection, i.e. connect on the load side of the main breaker or load side of the fuses. Energized testing can be used to observe voltage and current FFT data to isolate spectral peak sources from upstream or downstream of the test connection point.
Step 6 – Verify or Confirm Identified Anomalies
When a potential problem is identified, it is just that; a potential problem. You should take steps to validate that it is, in fact, a problem. Sometimes erroneous data or unique characteristics of the equipment under test may give indications of a fault. You should perform all possible equipment checks and run additional correlative tests to validate your indications. Let’s say, for example, your test data indicates a possible high resistance connection.
Check your test lead connections and re-run the resistance tests. If you get a current unbalance, check equipment loading to ensure that the unbalance is not due to insufficient loading. If load is sufficient save the data and run a quick power quality test, with all the current probes on one phase, to make sure that you do not have a defective probe. If you have Fpp (Field Pole Pass Frequency Sidebands) sidebands indicating possible rotor bar anomalies, check for swirl effect, current modulation, increased current draw for a given load and reduced
in-rush current with longer start duration. These simple checks and correlative measures, can prevent erroneous data leading to bad calls, which can cast doubt on either you, the technology, or both.
Next month, the last two steps will be examined.