
For those of us that don’t frequently inspect buildings with infrared, it may seem at first glance to be an easy job. However, thermographers must take care to interpret misleading patterns thoroughly; taking into account how thermodynamics influence the image we see on our view screens.
For the first part of a building inspection, conduction comes into play. We “look” at how the heat moves through solid materials, the items that make up the walls. We first need to understand what direction the energy or heat is flowing or moving (remember energy always moves from a higher value to a lower value). This then leads the building thermographer to the question of how much delta T is needed to perform a successful infrared inspection. According to ASTM C 1060, we need at least 10°C (18°F) from inside surface to the outside surface. The larger the Delta T, the better for our inspection. Now, you have to ask yourself, if it’s hotter outside and I’m inspecting from the inside, what would missing insulation look like? Or better yet, what should a normal wall look like? For the purpose of this discussion we will focus on a wood-framed house. A “normal” wall should have the studs appearing “warmer” than the insulation void (the area between the studs) and missing areas should have the void warmer than the studs.
Why? There are different conduction values at play. The studs are a fairly good conductor of energy as compared to the insulation. The insulation slows the transfer of the energy between the inside wall and the outside wall, that’s why it is in there in the first place. Where there is insulation missing, the studs become a better insulator than the empty space between the studs.
A good way to think about how the area between studs should appear, is to think about how you feel in the space you are standing. If you are in a cooler area (inside an air conditioned house) an insulated cavity should appear cooler than the studs. The studs are a better conductor of energy than the insulation. If you are in a warmer area inside of a heated house, the insulated cavity should appear warmer. The cavity should look the way you feel. If you are outside of the house and feel cooler than what you would be inside, the cavity should appear cooler. Contrarily, if you feel warmer than what you would be on the inside, the cavity should appear warmer.
This is just the basics of how the cavity should appear and there are many more factors that need to be taken into consideration for the building thermographer.
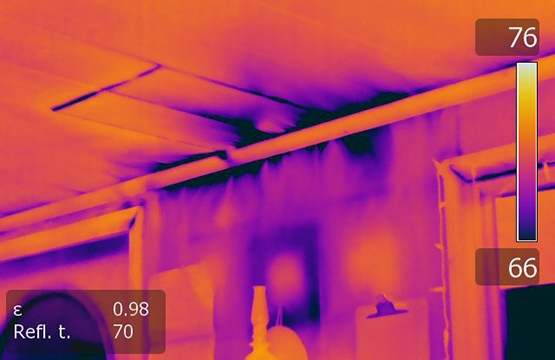
For the second part of the inspection, convection is used. The best way to conduct the convection inspection is to put the house or building under a vacuum (blower doors work great for this!) to draw outside air to the inside. In order to do this properly, there needs to be a delta T of a t least 5°C (9°F) again, the more delta the better. Now, with the building under a vacuum we are drawing, or forcing, the outside air into the building. After this is done, all we have to do is find where the air is coming in. If we are drawing warm air in, the effect of the warmer air across a surface is to warm it up. We can not “see” the air but we can “see” the convective effects on the surfaces it crosses.
For both the conduction and air leakage portions of a building inspection, the thermographer needs to have a solid understanding of heat transfer theory. This will ensure that he or she understands which way the heat is flowing and how this will influence the appearance of anomalies. This knowledge is vital for performing a successful infrared building inspection and can be gained through quality training.